Friday, October 18, 2013

Undead Doll (knife not included)

Are you flabbergasted about what to do for your Halloween outfit this year? Want to have some fun with your make-up and use up old false lashes?? Sick and tired of slutty store bought costumes?

 Well then my lovelies, a dead doll is the look for you this Halloween season, and here is how you can do it in 20 mins flat:

1. Put liquid latex over your eyebrows, (yes I'm serious), then put a layer from the corner of your mouth up towards your temples, think the Joker from Batman. Let it dry until stickiness is gone, and it feels just like plastic on your face.

2. Apply a luminous heavy foundation all over your face, (including your covered eyebrows even your lips, how weird do you look????), let dry and then apply a second layer. This is to really achieve the flawless doll look and will look much better in pictures.

 3.  Set with powder, don't afraid to be heavy handed with the powder as the products will need something to grab on-to later on.


4. Use a white eye pencil to white out your lash line and then create a circle under your eyes to make them more round. The circle should begin in your tear duct and end at your outer lash, you only need to make them more round, not larger.

5. Fill in the circle with white liner, heavy white eyeshadow (matte) or my favourite, white facepaint.

6. Line the "round eyes" with black liner, cut false lashes down to lower lash size and apply to the black liner under your eye, as bottom lashes. Then draw on eyebrows, just above your real ones, use an angle brush and a brown eyeshadow, but remember they don't have to look real, but they do need to look exactly the same on both sides. (That did take me a while to get right, symmetry is not a strength of mine!)

Check out this picture for the look:

This was the trial run, I used pencil which didn't work as well as the white face paint.


6. Apply a pink eyeshadow(or any colour you like really) on your lids, for me it didn't really matter as my fringe mostly covered it. You could also leave them bare for a real Barbie look.


6. The eyes are the most important part for making you look like a doll, so you can clump two or three sets of false lashes together for the top lashes, and apply them as close to the lash line as possible. This really adds to the doll-like roundness of your super creepy eyes!

7. Contour your cheeks and apply a rosy colour to the apples to make them look more rounded (you can add a few freckles if your going to be a rag-doll)

8. Apply a lip liner to the lips, going just outside your natural lipline to make them slightly bigger and unnatural looking, or you can just draw on smaller lips, Geisha style.


9. This is the fun part!!!!!!! Using your finger nail scratch at the middle of the plastic latex, tearing  and ripping it a little. Then apply a read lip stain along the lines, it totally looks like scars and blood :) If you have fake blood lying around, you can pour a little on, and let it run through the "scar".


10. Do your hair in whichever doll style you like (pigtails is defo easiest), choose your dolliest clothes grab your knife and your bunny, and hey presto, your a walking talking living.....well Undead Doll!!


I hope you liked my Undead Doll tutorial, if you have any questions, please add a comment, or a suggestion to change something.

Happy Halloween everyone :)

Le Grá,

F.A.S.H.

Sunday, October 6, 2013

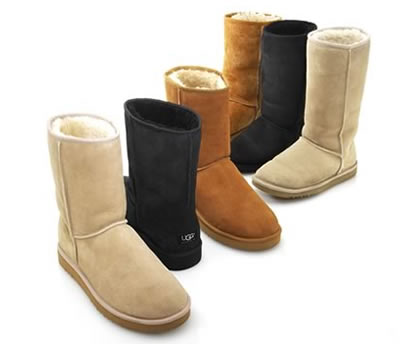
Voting Time - Uggs: where do you stand?

Now that we had our vote about the little things, the big question still needs to be addressed:


Uggs: favourite footwear or ugg-ly?


Just click the link and have your say:


Saturday, October 5, 2013

How to: Update your updo in 5 Super Simple ways


Going out tonightor simply to update your gruaig? Here are 5 easy updo's to do at home, with a few clips and a bit of back-combing and maybe an accessory or two, why not try one tonight?

1. The Messy Pony, a lá Leighton Meister

Often overlooked, this is a classic chic look, and super easy to do.
-Section off the top part of your hair.
-Backcomb from the back to the front to add height, and spritz with your fav hairspray,
-Using a fine-tail comb, run lightly through the top of the hair
-Pull back the hair into a pony and secure with a tight elastic

(to copy Leighton below, leave your fringe out of the backcombing, and wrap a piece of long hair around your elastic and secure with a Kirby grip)
Beauty Secret: Messy Ponytail
2.Punked up, half down, a lá Nicole Scherzinger

The quiff added to a half up half down gives a punky twist to a girly favourite.

-Start with poker straight hair.
-Section off the top part, and then into two halves again, front and back.
-Backcomb the back to medium height, and the front higher so that its higher at the front than the back, spritzing with hairspray as you go.
-Run your fine-tooth comb from 1 inch from the roots at the front, back along your hair, to create a smoother look.
-Pull all the hair back, as if creating a pony tail and clip section by section. Don't forget the part just under and behind your ear. (It will feel like a Mohawk line at the back)
-Run your fine tooth comb through the hair at the back lightly, to hide the clips and make the hair sit sleekly.

(To copy Nicole's gleaming gruaig, spray shine spray onto the "tail" of the mohikan, and spritz a little onto your hands and smooth across your quiff)


Nicole Scherzinger Half Up Half Down - Nicole Scherzinger Updos - StyleBistro
3. The Side French Braid, a lá Cara Delevingne

Oh God, who has not got a crush on this girl? Ok, so this is not really an updo, but who cares? It's amazing, and so uncomplicated.


- Straighten your hair
-Part to the side, and section a rectangular piece off above your eye and going back about 2 inches.
-From that section, start a French plait and work all the way back, down to the tops of the hair-
-Tie with a see through elastic, and your away with it :)

Duelo de escotes en la Gala del MET 2013


4.Accessorize , a lá London Fashion Week


Bouffants and bows, what a breathtaking combination. Accessories will automatically update your style and put your own stamp on it. Try a velvet bow, a jewelled embellishment, or even a turban or headband for the more adventurous!
 
Hair at PPQ| London Fashion Week Fall 2013

Jennifer Behr Spring 2013 Hair AccessoriesSpring 2013 Hair Accessories


4.Brazen Braids , a lá NewYork  Fashion Week

Braids are still bold for Aw13 and for Spring 2014, so get those fingers out and start braiding. Fishtials, French, rope and the standard plait braid are the most popular. Work with mideel partings and combining braids to make different shapes.

-Part hair straight down the middle, and make two "pigtails" at the baack of the head.
-Plait both pigtails in the style you want (fishtail is in the pics)
-Wrap the two braids around each other, or sweep them across to each other, and pin with Kirby grips to secure.
Christian Siriano    Amazing what you can do with pigtails! This chic updo at Christian Siriano is formed by crossing two fishtail braided pigtails.
Or you can have crown braids, (my personal favourite, especially with the plum lips.)

This does require having medium long hair, or using extensions, for instructions check out Lilith Moons youtube video here. It would take far too long to describe it on here, can you say carpal tunnel syndrome?


Alice Olivia NYFW 2013 hair - braids


 And that's it girlies, update your updo in 5 easy ways!

I'm off to try the punked up half down, enjoy your Saturday night, whatever you're doin' and wherever you are :)

Le Grá,

F.A.S.H


Sunday, September 29, 2013

Stylist Tips: Don't blow the bank to update your look!

Hi girlies, sorry it's been so long since my last post, but I was super busy with a new job( #yippee!) So here's my newest post! Enjoy :)

 As we are told about all the new trends, styles and fashion updates, I find myself thinking about winning the Euromillions, just to try to keep up with all the shiny new clothes, shoes, accessories, and jewellery that I would love to make mine!

However, there are many tips and tricks that stylists use to keep themselves high up on the fashion ladder, so lets do the top 3!

1. All stylists know that accessories are key to any statement, and it's no different when updating your look from season to season. This season punk is huge, tartan and animal print is everywhere. Wear an animal print scarf, or a tartan wristband, and even something as small as a pair of spiked earrings, or an ear cuff can add a touch of punk to an outfit. (P.S. Don't forget your deep berry lipstick or stain to really punk it up)


2. Invest in a statement piece, that can be worn many different ways, like this skirt from Gossip, in Wexford, it takes you from day to night easily, and that's just two ways of wearing it!
Day to Night : Leopard Print Skirt
FASHbloggers Set from polyvore.com

3. Although stylists are primarily focused on fashion, they can also branch out into hair and make-up, giving tips on trends in gruaig and make-up too. If you really fancy breaking out of the box, try a mo-hawk updo that is A-mazing. I especially love Kim Kardashians sleek half up half down, its punk, but totally modern and pretty to boot!

If it's beauty AW13 your looking for, here's a great video from Elle stained lips, big brows and pale luminous skin......oh welcome Autumn (*throws bottle of tan into the bin)


So there is is girlies, you don't have to break the bank, or blow your budget to be on the top rung of the fashion ladder, and although I used punk as the example, you can do this with any trend.
 
Again ladies, any and all questions are welcome, leave a comment on the page if you like it, or maybe have something to add to it yourself, I love hearing new tips :)


Le Grá,
 
       <3    F.A.S.H.   <3


Thursday, September 12, 2013

Liebster Award :)


I am proud to announce that yours truly has been nominated for a Liebster Award by Rusty Sequins (check out her amaze-balls blog here

So the Liebster is an award by bloggers, for bloggers, where you answer 11 questions that the other blogger ask you, them pass you 11 questions onto your fav 5 bloggers, easy right?

I was planning to do a Q&A soon anywhoo, so here it goes :)

1. Fashion and Beauty related: What's the one thing you can't live without

Vaseline Rose Balm, it's a lipstain, a brow smoother, a moisturiser...just an all round multipurpose product! 

2. If you were given the chance to travel anywhere in the world, where would you go? 

I've always wanted to see Rio at Carneval time. Just to see the costumes and the music would be amazing, I watch the Disney movie every now and again, and sing along with the songs. I'm going to learn to Samba someday, I swear..... (D'you know you can burn over 400 calories per class, and it shapes your derrière!!)

3. Beauty Related: What do you always carry in your handbag?

Everything, a full makeup bag.....honestly. I always have the essentials but especially a loose powder and a fluffy brush, I have oily/combination skin. Even if you have the most beautiful colour lips or eyes, if you have greasy skin it doesn't look right. 

4. Online, boutique and in the high street, what is your favourite store?
 
I can honestly say that I don't have a favourite store, if you held a gun to my head I'd say River Island, but I also love Bershka, New Look, ASOS, and boutiques and highstreet shops in Wexford. I do love to shop online though.....because I'm lazy :)
ShuUemura Hard Formula Brow Pencil

5. What is your favourite beauty product at the moment? 
 
Right now, it's my Shu Uemura Hard Formula Brow Pencil. If you believe your eyes are the windows to your sould, then eyebrows are the curtains, and who doesn't like nice curtains?? This pencil is perfect to build the colour and intensity whether day or night.
 
 
6.  Why did you start blogging?
 
I was always interested in beauty and style, and people used to ask me where I got that or how did I do this. I didn't have the confidence to blog when I was younger, but when I moved to Dubai for a year I really became more self-confident and decided to give blogging a try when I got home....and FASH is the result!
 
7.What is your main goal in life?

I know that this is the cringy-est, most puke-inducing answer, but just to be happy, truly happy with what I have :)

8. What/who is your favourite blog that inspires you?

It has to be Kandee Johnson,  I know that she is a professional make-up artist (and I'm most certainly not). I love her kookiness and her fun-loving way of blobbing and vlogging (video blogging) She has been through hard times, but always manages to smile and pass on her happy go lucky ways. Plus, she gives fantastic tips for novices and beginners, including lower budget dupes.

9. Is there any skill or craft you would like to learn?

I would love to learn to sew. I'm forever eyeing up material to make a skirt or using an old skirt to make a scarf, but I'd love to learn to do it properly. If you ever see a deal on Groupon or Grabone, let me know :)

10. If you were to be anyone in the world for a day, who would it be?

I know it's completely ridiculous but I'd love to be Barack Obama, simply to see what it's really like to be President, and I'd ask all the conspiracy theory questions about Area 51, and aliens and sit in the Oval Office. I'd also ring every cosmetic company and be like "Hey, I'm the freaking President, gimme some free stuff!!"

11. Which do you rather, mascara or foundation?

Both are necessities for me, but I prefer mascara, it makes your eyes look brighter, more awake and wider. Even if you have foundation on, if there's no mascara it just doesn't look right!


So there are the 11 questions that Rusty Sequins asked me, here are my 11 to ask.

1.What is your favourite cosmetic brand and why?
2. What is your best beauty or hair tip from the professionals?
3. If you were on a desert island, what beauty product or tool would you bring with you?
4. Tell us a joke...
5. If you were a dog what type would you be and why?
6. What is your favourite thing to do to relax?
7. Red lips or nude lips, which do you prefer and why?
8.What is your favourite beauty tool and why?
9. What made you start blogging?
10. If you could meet one person in the whole history of the world, who would it be and why?
11. What was the most expensive beauty product you have ever bought? and was it worth it? 


I'll tweet my nominations, so keep an eye out tweet peeps :)

Le Grá,

F.A.S.H.

Thursday, September 5, 2013

The Wexfordian : August : Shop Summer Sales for Winter Style


As a great Summer now moves into Autumn, the shops are full of Summer merchandise on sale. And as I trawl among the floral dresses and floaty Summer skirts, the thoughts of Winter are on my mind (unfortunately) But don’t despair ladies, there are plenty of ways snap up a Summer bargain to use for your Winter style in Winter, providing you follow these 5 golden rules.

1.       Think layers.  Denim shorts and skater skirts can be worn with leggings and converse for a colder days, as the Rebel  look is still on trend for Winter. Cue more over the top studded leather bracelets and tartan accessories.

2.       Maxis can still be worn in Winter. This could be a more difficult trend to carry off, but as long as it’s not a Summer colour or floral, you can rock it with shoe boots,  a long sleeve top and a cardigan. P.S. Don’t forget your beanie, to really hit the fashion nail on the head!


 http://fashblogger.polyvore.com/ (    follow me :)     )


3.       Watch this colour. Navy is the main colour this season with Burgundies and Reds, Purple, and 40 Shades of Green close behind. Look out for these colours in sale items, especially in skater skirts and flowing tops to pair with skinny jeans and shoe-boots.

4.       Precious metals and gleaming gemstones. Embellishments and metallic are continuing into the cold times to come. Keep an eye out for glittering golds and all things adorned. You can bet that one of your favourite Summer dresses can be rocked with tights and boots instead of bare legs and sandals.

5.       Mad for midis. The midi skirt is still going strong for Winter, this calf level beaut is a fashionista’s best friend this winter. Team with a pair of pointy pumps or even these dainty front bow booties from Penneys, a steal for €15!


And that’s all folks, a quick spring from Summer to Winter! The main rule is to steer clear of long floaty and bright and white florals as they are strictly Summerwear. A top sty-lusts tip is bring a pair of black tights and winter boots with you and try them on in the shop to see what they are like together.


Enjoy your last days of Summer…..


Le Grá,

F.A.S.H.

Check out The Wexfordian :)


Check out The Wexfordian for extra FASH blog info

http://digital.turn-page.com/i/149258

Le Grá,

F.A.S.H

Mini Review ; Rimmel Scandaleyes Thick and Thin Liner

Oh Rimmel, you were my best friend back in the days of the first eyeliners, teenage discos and (cringe) cargo pants with strings.....


then you brought out the liquid, and the "professional" liquid, and it was true love in Jet Black, through thick and thin!

Now, you have the new "Scandaleyes Think and Thin" eyeliner, a felt pen, stating water-proof and smudge-proof abilities, with concentrated pigments and all the rest of the empty promises.


I was so disappointed with this eyeliner at first, let me explain the three major faults first then the one redeeming factor :(

1. The colour was not at all concentrated, it was more like a charcoal grey than black, a big no no for eyeliner.

2. Any primary child will tell you that a felt tip is useless when wet, therefore the minute it touches your watery eye, it loses all black magic, and nothing comes out until you rub it to dry it.

3. The tip of the felt was an angled one, sounds swell, until you realise the tip is dried out, or there are clumps of product on it, effectively ruining you beautiful concealer and great great blobs and or spaces, reminiscent of A Clockwork Orange!


Ok, so there are the negative points, and they are big ones, why would you bother buying this product if it's this bad?

The one feature of the eyeliner, is the fact that you can use it on un-mascara-ed peepers to create a look of no make-up literally. Just push the felt tip into the upper lash line, because it is very light and there's not a lot of gloopy product on a brush, it does boost the lash line, without the obvious line black line on top of the lashes. BUT how many times are you really going to use this, a good eye pencil could do this for you.....

Sooooo, I would pass this over, a no go with F.A.S.H., and it's not your gona be your BFF through thick and thin :(

Le Grá,

F.A.S.H.

Wednesday, August 14, 2013

Shop Summer Sales for Winter Style


As a great Summer now moves into Autumn, the shops are full of Summer merchandise on sale. And as I trawl among the floral dresses and floaty Summer skirts, the thoughts of Winter are on my mind (unfortunately) But don’t despair ladies, there are plenty of ways snap up a Summer bargain to use for your Winter style, providing you follow these 5 golden rules.

1.       Think layers.  Denim shorts and skater skirts can be worn with leggings and converse for a colder days, as the Rebel  look is still on trend for Winter. Cue more over the top studded leather bracelets and tartan accessories.

2.       Maxis can still be worn in Winter. This could be a more difficult trend to carry off, but as long as it’s not a Summer colour or floral, you can rock it with shoe boots,  a long sleeve top and a cardigan. P.S. Don’t forget your beanie, to really hit the fashion nail on the head!


3.       Watch this colour. The main colours this season are Navy, Burgundies and Reds, Purple, and 40 Shades of Green close behind. Look out for these colours in sale items, especially in skater skirts and flowing tops to pair with skinny jeans and shoe-boots.

4.       Precious metals and gleaming gemstones. Embellishments and metallic are continuing into the cold times to come. Keep an eye out for glittering golds and all things adorned. You can bet that one of your favourite Summer outfits can be rocked with tights and boots instead of bare legs and sandals.

5.       Mad for midis. The midi skirt is still going strong for Winter, this calf level beaut is a fashionista’s best friend this winter. Team with a pair of pointy pumps or even these dainty front bow booties from Penneys, a steal for €15!


And that’s all folks, a quick spring from Summer to Winter! The main rule is to steer clear of bright florals as they are strictly Summerwear. A top stylists tip is to bring a pair of black tights and winter boots (loike shoeboots) with you and try them on in the shop to see what they are like together.


Enjoy your last days of Summer

Le Grá,

F.A.S.H.

Thursday, August 8, 2013

Bounce in your Barnet - the Baking soda and Vinegar method

If this sounds like a mad idea, I hear you, but take it from yours truly, it works!


I noticed in the last few weeks that my hair was greasy on top, and dry at the ends. Normally I would have a bit of a bounce in my tresses, but for the past few weeks they've been lank and dull. I nearly dislocated my shoulder backcombing to get volume and sprayed many a lotion and potion onto my roots to lift them, all to no avail. I was at my "splits" end

Then I remembered a baking soda and vinegar rinse that I heard of many moons ago. I researched it on the old laptop-aroony, and found mixed results, some people loved it, some loathed it.

I thought it really worked a treat, once I got over the weird sensation of not having a traditional foaming shampoo! Once my hair was dry it felt lighter, they're was definitely more volume and it looked brighter too.....yippee! No more heavy roots!

The one thing I did notice however, was that my longer lengths were a little more difficult to blowdry and not as soft, but I added a lil' Morrocan oil to those babies and they were soft as silk after, and there wasn't even a vinegar smell after rinsing it out! Delira :)

But how does this home hair clarifying work?

Flashback  to my Leaving Cert Chemistry class.....somebody pass me my "science" glasses....


Baking soda is a base (alkaline), and vinegar is an acid. These two cancel each other out when put together, and creates a cool volcano! But it also creates water with a PH value of 7, the same as our skin. With me so far???

Did you know that shampoos is also a base, and conditioner an acid, they are very weak, but that is why they work so well together. However, shampoos and conditioners can also have added chemicals, for colour care, volume boost or clearing dandruff. It's these left behind chemicals that make our hair lank and dull :(


So like shampoo and conditioner working together, so also does baking soda and vinegar as it re-balances our scalps PH, and as the reaction occurs, it removes the build up of products on our scalp and in our hair.

The baking soda removes the build-up because it is like a really strong shampoo without the foam. The vinegar, as an acid, acts like a conditioner, smoothing the hair follicle, and closing the pores on the hair strands.

The method is the exact same as regular shampoo and conditioner. I just put two tablespoons of baking powder in an old shampoo bottle and fill with water, and then two tablespoons of vinegar in a conditioner bottle, and hey presto, my own hair clarifying set ready to use once a week!

Here is another "recipe" to make your own hair clarifying set!.Try it out and let me know if it works for you.

Best of luck with your new bouncy barnet.....


As always girls, if you have any questions or comments, post them here! And now F.A.S.H. is writing for the Wexfordian magazine, check it out here

Follow on Facebook and Twitter for extra news and updates!

Le Grá,

F.A.S.H


Tuesday, June 25, 2013

Amazing Maxis @........Tesco??

Would you look at these beauties from Tesco!? I know I this is my second post about Tesco clothes in a short while, but I swear on the baby Jesus that they have the best maxi dresses around. I loathe spending big money on maxi's because let's face it, our Summer lasts approx. 2 days...... :(

They start at only €25, upto €32 and are perfect for a BBQ or to put in a suitcase for your holiers (any chance you can fit me in too?)

The material in these beauts is super-soft, and some might not even need ironing after washing......a miracle!

Let me know what you think girls :)

Le Grá,

F.A.S.H


Tuesday, June 11, 2013

Exterminate the Brush Germs!!!!

Ever wonder why you are skin is breaking out when you cleanse, tone and moisturise like a demon, use regular face masks and drink 2 litres of water a day.....? Let me ask you, when did you last clean your make-up brushes and sponges?

While you are deep exfoliating and prepping your skin to the last, germs are building a mini empire on your beauty tools! Think back to that old domestos ad, with the bacteria hell bent on spreading disease and sickness, but instead now, they're after your SKIN!! 

These little blighters cause skin blockages like spots and clogged pores. And not only do your brushes carry these, but also dirt, debris and dead skin!

Putting make-up on with these brushes is like trying to paint a wall with a filthy paintbrush! The colour won't be right, the paint will be dull and it could start flaking.......FLAKING!!!!!! 


Now that you are sufficiently scared of your dirty make-up brushes, here are the three steps to cleaning your brushes, and annihilating those dirty germs:

1. Half fill a bowl/sink with warm water and dip and swirl the brush or sponge until all the hair is good and wet. The water might get a bit cloudy here, but wait until step two!

2. Squeeze a little baby shampoo or a gentle hand soap onto the fibres, and using your fingers, rub it in (here you can imagine your a hairdresser to your brush!) then plunge it back into the water and swish swish swish. When the water gets dirty, refill it with fresh water and rinse and repeat until the water is clean. This can take anything from twice to 5 times, especially more dense powder brushes. 

[While you're doing this, take note of just how much GUNK is coming off the brushes and wash those nasty germs down the drain]


3. Dry your brushes with some paper towels like you would a paint brush. Don't stomp the brushes in, just rub them like your painting a picture. Then shape the bristles into their original shape, leave to air dry for a day or so and voila, I swear you will see the difference in your makeup application! 

(Top tip: put in a hair treatment and slather on a face mask while doing this for extra beauty points.) 

As always ladies, comment below, and follow on Facebook for daily posts, tips, and tricks!

Le grá,

F.A.S.H


Wednesday, May 15, 2013

Review: Shu Uemera Beauty and Lash Bar Brown Thomas

If eyes are the windows to the soul, then eyebrows are most definitely the curtains!

I was pondering this to myself one day browsing the heady selection in Brown Thomas on Grafton Street in Dublin, when, out of the corner of my eye.....a revelation!


The Shu Uemura  Beauty and Lash Brow just popped into my vision, and I had a mental high five with myself. I was looking for a good tweezers, but did I have a good shape? So, killing to beauty birds with one stone I decided to glean some of the girls expertise.

The main premise is that the girls measure your eyebrows according to your face shape, and features. They use little rulers and mirrors to show you where your brows should start and end, and then they shape them for you, all for €20.

I can hear your brain ticking now ladies, why would I bother going to Brown Thomas when my normal beautician can pluck, wax, or thread my eyebrows into shape. Well, the reason is because these therapists are specially trained to alter your brows for your face shape, and they explain what they are doing, while you are looking at them doing their stuff! So ipso facto, when you are at home you know where your eyebrows should start and end. Great stuff altogether :)

I was lucky that there was a space available in the next half an hour, so they slotted me in (Thanks girls!)

So there I was sitting in the middle of Brown Thomas, with pencil lines all over my forehead and eyebrows......mortification or wha'?

 Sarah (my therapist) kindly explained to me that my eyebrows were too far away from the bridge of my nose, and one side was kindof wonky (my words, not hers!) Sarah also told me where my arch should be and where to pluck underneath it to emphasize the shape.

She was absolutely lovely as she told me not to remove any more hair on the inside of my eyebrows, and also to let them thicken out a bit to achieve the stronger brow look, especially for nightime.

In the end, she filled them in using the special Shu Uemura Hard Formula Eyebrow Pencil in hard 9, which really finished the shape, and filled in the sparser hairs destroyed by years of over-plucking. When using the pencil she said feather it from the middle of the brow down to the edge first, and then work the pencil from the inside edge out, using light strokes.

 I did  buy the eyebrow pencil, because I used to just use brown eyeshadow and an angle brush, and wanted to try something new. It costs €19.95 and is well worth it.

My actual pencil <3
 
The final result was gorgeous, and I couldn't wait to get out there and try it for myself. Altogether, It was a great learning experience and Sarah even threw in a few Shu Uemura samples for me too.
 
The pencil itself is as big as a regular pencil, which is longer than most eyebrown pencils, about one and a half times bigger than a Rimmel one, so that in itself is a bonus.
 
The first time I used it I was surprised at how buildable the colour is, it starts out very light, but it really builds up with looking overly dark on your eyebrows. Groucho Marx....no thanks!!
Eyebrows like Groucho...no thanks :)
There are a few tipes if you are going to go
1. Let your eyebrows grow out a bit. I wish I had let mine go a bit wild for a while, so that she could really shape them properly.
2. Be prepared for a sales pitch, leading questions such as "What moisturiser do you use" What is your regular skincare routine?" And such, answer politely, but don't get suckered into buying more than you want.
3. Prepare for a little pain, after all it is tweezing!


And that's it ladies! Eyebrows, the curtains to the windows on your soul, and Shu Uemura is like your own interior designer :)

As always, leave any comments below or on the facebook page, subscribe, retweet or add the blog on bloglovin :)
There are always more tweets than anything, for daily updates find me on twitter

https://twitter.com/FASHblogger

Also, F.A.S.H has some BIG news to share in the next week or so, so watch this space :) sssshhhhhh

Le Grá,

F.A.S.H.


Wednesday, May 8, 2013

How to : Perfect the Red Pout

With The Great Gatsby about to leap onto the big screen, statement lips are about to get, well, more statement than ever, and there is no bigger statement than a strong red lip.

The ultimate chic rouge lip has eluded many a women, from staying power to colour bleeding and beyond. But this guide will help you perfect your red pout.


1. Make sure your lips are moisturised and smooth, no matter how well you apply your lippy, if those babies are flaky and dry, it just will not work. Use a flannel or even a soft toothbrush to exfoliate your lips, and apply a small amount of Vaseline and leave on (while doing your hair or nails) for aboiut 15 minutes or so.

2. Cover your lips with your foundation, this will fill in any fine lines and provide a base for the lip pencil and colour to cling to.

3. Use a nude or light rose pencil to trace around your lips, this will stop the colour bleeding into the fine lines around your mouth. If you have smaller lips, you can go slightly outside the lip, to give the allusion of a fuller mouth. You can also give more shape to your cupids bow (the top part) if you wish. Then fill the lips in with the pencil. Again, this is building up the base for the lipstick to really grab onto, giving it great staying power.

(The reason I use nude or rose is to prevent that line around your mouth if the lipstick does wear off a little, that line is a pet hate of mine.....grrrr )

4. Apply your lipstick first with a lip brush, really filling in all the little creases on your lips, then take a piece of tissue and blot once to remove excess. Then using the brush and more lippy, go over the lips again.

This is the point where you can add gloss. I generally don't as this can make the lipstick slide around, and I do prefer the matte look of red lipsticks, but it's up to you.....

5. Do the porn-star trick, if you don't know what this is, you can look it up, (It's very funny to see people do it, and you will see why it's called the porn star) But basically, you put your finger in your mouth, and close your lips around it, and pull your finger out. Thus removing the lipstick from the inside of your lips.

(Why you ask? Well, unless you like the look of red teeth, I would highly recommend this trick!)

And that's it, your guide to the perfect red pout! All you need is to pop your lippie in your bag and retouch every now and again for beautiful, kissable red lips a la Anne Hathaway, Megan Fox and Kim Kardashian.


As always girls, leave a comment or a question here or on the facebook page. Like and share, or follow on twitter :) I'm always posting new tweets or links to great offers and ideas, which might not be on here!

Le Grá,

F.A.S.H.


Thursday, May 2, 2013

Bloglovin - Get on it, and add fash blog to your list :)

<a href="http://www.bloglovin.com/blog/7362653/?claim=9bsabr544p6">Follow my blog with Bloglovin</a>

Catrice "Pimp My Shrimp" Nail Laquer Review

The Catrice brand has grown massively in popularity since Penneys picked it up here in Ireland, and I personally thought that the price was too good to be true for quality make-up. UNTIL, a make-up artist used a lip-gloss on me! I thought "The cheek of her, using a cheap brand on me!" I know make-up snobbery at it's highest! So I asked her about the brand, and she said it's one of the best brands out there, and likened it to Essence, but better!

AS a non-animal tested, non celebrity endorsed range that releases 12 Trend Editions per year, this is a brand that is trying to be taken seriously, as you can see from it's website here:

So I thought to purchase a few "essentials" on my next shopping spree in Penney's. So here is my first mini review:

Catrice "Pimp My Shrimp" Nail Laquer


I thought that this name was just so perfect for a nail varnish that I couldn't leave it sitting alone and lonely on the shelf!

The colour is a coral colour, and dries to a slightly gloss finish. This colur is EVERYWHERE now, and a pop on your nails really makes it feel like summer.

 This laquer is like Ronseal "it does what it says on the tin", the colour is bright, vibrant and very intense and the best part is it's only €2.99 in Penneys or Sam McCauleys.


After applying two coats, I did put on a clear top coat, and I was chip free for nearly a week!

Cannot say how pleased I am with this, and will definitely be purchasing more soon ( probably nest payday!)

Are there any nail varnishes you recommend? Give us a quick review here, or on the facebook page
I love hearing new idea's and seeing new comments on the page!

So what you waitin' for, go "Pimp your Shrimp" now with Catrice!

Le Grá,

F.A.S.H


Monday, April 8, 2013

Quickblog: Save our Skin from Sun

Ok, ok, maybe I am getting ahead of myself, but a girl can live in hope right?

You know us Irish, the minute we see the sun, we strip off and lay out under the baking rays before it starts to rain again.

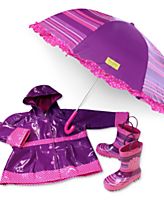
Here is a pic of my most used items in an Irish summer:


 (See any differences in styles here???? )


But do we realise that even when it's miserable outside and the sky is grey, we still need sunscreen, because those pesky UVA and UVB rays are still lurking there.

Most foundations now come with a built in SPF (Sun Protection Factor), but some are so minimal that it might not give our beautiful fair skin the protection it needs.

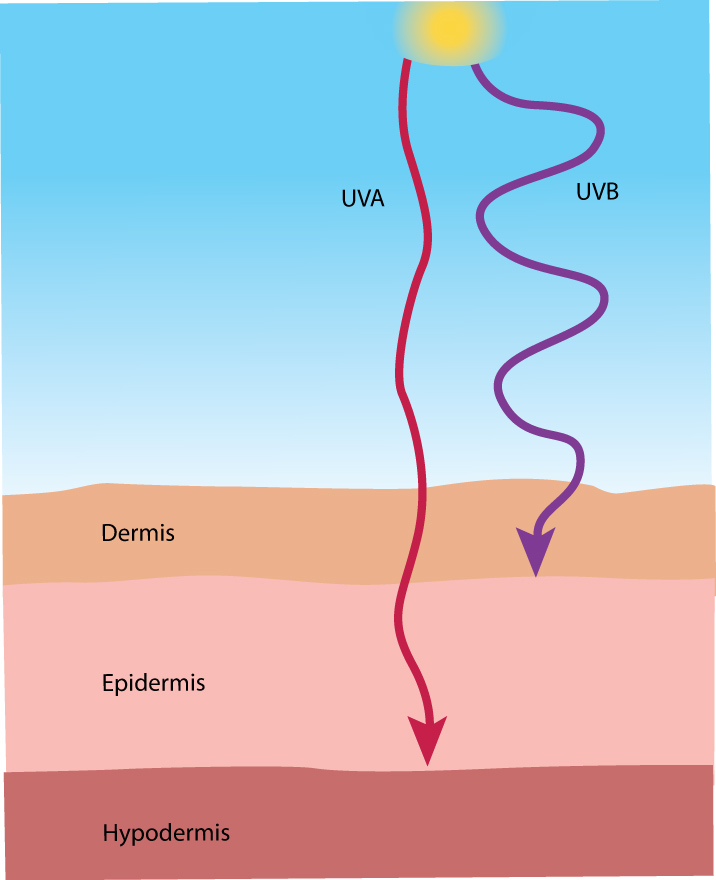
So first we need to discover the difference between UVA and UVB rays, this diagram shows it really well:


As you can see from the diagram, UVA rays affect the deeper layers of skin, and have been long known to cause wrinkles, but also recently linked to skin cancers. UVA are less intense but we are exposed to them more frequently.

UVB on the other hand causes the redness and the tan that we long for. This has been proven to be linked to melanomas and skin cancers for years, and is most intense during April to October, and varying parts of the day.

For more information, click here

And there is it science, over, glasses off!


 So now we know that they are SUPER bad for us and our skin, how we protect ourselves from them?

A lot of the time suncream and make up are like Jen and Angelina, they go the same places, but man, do they avoid each other, and they won't ever work together!

Most suncreams are oil based and therefore, unless your make-up is oil based too, it just slips and slides away, and make-up generally only has a low SPF so what's a girl to do but mix them up??

Here are the best reviewed under make-up suncreams and skin primers on totalbeauty.com, these are skin protectants that work well with and under make-up. I especially love the brush types that you can reapply.

http://www.totalbeauty.com/content/gallery/best-facial-sunscreens/p60352/page2

Others include:

Vichy Sunscreen Face Cream SPF 50+
La Roche Posay Anthelios SPF 30, and
Hamilton Everyday Face Cream

A lot of these are expensive, but they are worth it, think of all the botox you could avoid in the long term!

If anyone has tried these before, please leave a review, I'd love to hear from you!

Remember to leave any questions or comments here, you can click "Join this site" to follow with your yahoo or gmail account. and share it with your friends via facebook or twitter :)

I try my best to reply to all comments, questions, and requests and finally, thanks for all the support girlies.

Le Grá,

F.A.S.H